How did you integrate technologies - software, hardware and online - in this project?
The technologies that we used throughout the course of the year really helped us to produce our blogs (evaluation questions included) and also our film opening.
Hardware
The camera that we used throughout the process of filming was the SONY A58 we borrowed this from the school media studies department.
Before filming, I viewed a guide online of the various functions of the camera to familiarize myself with how to use it.
 I learned different functions such as how zoom in and out and the difference between taking photos and filming and how to change between the two. We used this camera for every piece of filming we did.
As I was acting in the film, this meant that I had less opportunity to film scenes. However, I did some filming on the establishing shots/ shots I wasn't in.
I also filmed all of the directing done by Jon and Sophie.
An example of a technique we used with this camera was deep-focus. We utilized this in the church scene when filming the candles.
We used manual focus throughout filming as in our Swede (a preliminary exercise) we found that the auto focus created a clicking sound which was very distracting. The auto-focus also made our short swede go in and out of focus which was very annoying. As I said, we used manual focus to avoid this.
The Tripod
At the beginning of the year, we started by using a Cullmann CB6 Tripod. This was provided by our school. However, It was quite shaky.
Before beginning filming, we received a new Mantona Scout tripod which was much sturdier and easier to use.
As the tripods were very simple to operate, it wasn't very hard to use them. I had also used a tripod in my Gcse Media therefore I knew how it worked

We used a tripod in almost every scene we filmed as we knew how important steady footage is and the tripod insured the footage was steady.
The scene in which we didn't use a tripod was towards the end of our film opening, during a POV shot. This was for effect as the slightly shaky footage provided tension and suspense.
SD card
 We used my Kingston 8GB SD card. If we were to do this project again, I would have chosen an SD with more storage, simply down to the fact that we ran out of space a couple of times during filming and had to stop filming to import it onto a Mac.
The SD was very easy to use as all of our laptops had SD card slots, making it easy to transfer footage through it.
Something that could have helped us, would have been to have another SD card on us at all times incase something went wrong during filming.
Smartphone
I used my phone a lot during the entire process.
Firstly, I used it to record audience feedback. It was very useful for this as I always had my phone on me and so, whenever there was an opportunity to record or get some audience feedback, I just quickly filmed it on my phone.
My phone also allowed me to access my emails and messages quickly meaning I was in touch with my team mates at all times.
Laptop/computers
 When in school, i tended to use the computers provided by the school (Fujitsu) however, I actually had quite a lot of difficulties when using blogger on these computers (I couldn't embed videos, and the font size/colour kept changing after publishing the post).
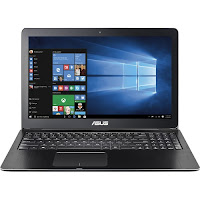
Therefore, I did all of that at home on my own personal laptop (ASUS).
I also borrowed Sophie's laptop when doing some editing as my laptop is not a mac and so I couldn't use final cut on it.
Software/Online
My phone also allowed me to access my emails and messages quickly meaning I was in touch with my team mates at all times.
Laptop/computers
 When in school, i tended to use the computers provided by the school (Fujitsu) however, I actually had quite a lot of difficulties when using blogger on these computers (I couldn't embed videos, and the font size/colour kept changing after publishing the post).
 Therefore, I did all of that at home on my own personal laptop (ASUS).
I also borrowed Sophie's laptop when doing some editing as my laptop is not a mac and so I couldn't use final cut on it.
Software/Online
Final Cut Pro
The editing software that we used was Final Cut Pro. When starting this project I didn't know how to use the program at all as I had never used it before. However, It was very easy to pick up. I looked online at a couple of guides on the different tools and what shortcuts there were. I figured out how to change the font size and colour by myself but it was very clear and easy to use, so it didn't take long at all to figure out.
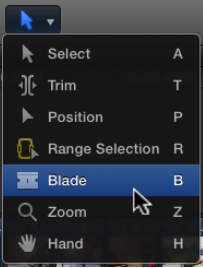
I have created a quick guide of the tools.
The first one is Select. (cmd A) This is just the usual arrow that you would use to drag clips in to place, or re-arrange them.
The Trim tool (cmd T) can be used to cut the end or beginning of a clip. For example, if you want to shorten a scene/clip, you just change to this tool and then drag away however much you want
The Position tool (cmd P) manually places a clip in a specific location without involving other clips.
If you drag a clip over another using this, it will overwrite it.
The Range Selection tool (cmd R) allows you select a certain section of a clip. This is very useful when importing footage, as you can select a certain part of the footage to add to your timeline.
The Blade tool (cmd B) is used to 'cut' a clip. To do this you just select the tool and then click on the place where you want to split the clip.
The zoom tool (cmd Z) is pretty self-explanatory, you can just use this to zoom in or out on the timeline.
The last one is the hand tool (cmd H) and it allows you to move the Timeline back and forth
Sony Vegas Pro
 Because I don't have a mac, when I was at home, I used Sony Vegas Pro to edit things I did. I didn't actually like using it very much as it was complicated to use compared to Final Cut. The layout was a bit confusing to me and it took a while to get used to .
I much prefer using Final Cut as its much more simple and easy to understand and work with.
To communicate as a group, we used a chat.
 This was extremely useful as we could share photos and links among ourselves.
We also could discuss things about our film, such as whether it was going to be an indie film or not.
It was also very useful for arranging when to meet up to do filming or other things that were coursework-related.
Google Drive
Another way in which we integrated technologies was through Google Drive. This is a screenshot of what our Google Drive looked like at one point during the year:

This again, was really useful as it allowed us to share clips and videos to each other. This was actually my first time using google drive but I found it really straightforward and easy to work with.
Jon set it up and then Sophie sent me an invitation to edit it over gmail which enabled us to share content onto it.
I would really recommend this as a way of sharing videos as its very quick and easy to use.
Skype
Finally, me and Sophie used Skype to work on our coursework together, usually on weekends.
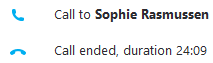 We actually used this when doing evaluation question 3, as we screen-recorded our chat show style Skype session.
 Skype was very practical and helped us a lot when we wanted to discuss something that would be too complex over text/chat and would take a while to talk about.
No comments:
Post a Comment
All comments are moderated.